Today, I have the last card that I made using the Circus alphabet. It is made using the Art Philosophy cartridge. This was my first venture into the chalkboard effect. I really like how it turned out though.
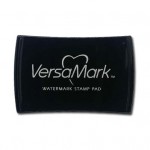
To do this, you will need: Black cardstock, dryer sheet, Versamark Ink, White Embossing powder, A craft heater, stamps, White Daisy ink, and a paper towel.
1 - rub a dryer sheet on the surface of your balck cardstock. (this helps prevent strays when heat embossing)
2 - Stamp your desired image on the black cardstock using the Versa Mark ink.
3 - Sprinkle your embossing powder over the stamped image.
4 - Using your craft heater, heat embossing powder.
5 - Using a paper towel and your White daisy ink, start rubbing white ink on your image. Start with a small amount and add more as you go. Remember, it is easier to add more than to take away, so go slow.
Cricut Art Philosophy Chalkboard Card file
To win:






That is a stunning card!
ReplyDeleteMelanie, I love this card! And the way you did the chalk board too. Lots of experimenting to get the right effect. Thanks for sharing.
ReplyDeleteLove your love card
ReplyDeleteLove it inside and out.
ReplyDeleteNice card! Thanks for sharing your time, talents, and ideas with us.
ReplyDeleteWow! That is a unique card! Beautiful! Love it!!! TFS!
ReplyDeleteI LOVE the matching card and bag! Thank you for sharing your projects with us.
ReplyDeleteLOVE the matching bag and card! Beautiful!
ReplyDeleteLike the popular chalkboard look. Like the embellishments; especially the flourishes. I used a Hero Arts chalkboard stamp recently and like the look.
ReplyDeleteMelissa
"Sunshine HoneyBee"
Lovely card! Thanks for showing us how to make the chalkboard effect.
ReplyDeleteThis card is fabulous!! I love your chalkboard technique!!
ReplyDeleteThese are wonderful! What a lovely gift for a lovely friend :)
ReplyDeleteWhat a beautiful card! I can't wait to try the chalkboard embossing technique. Thanks for sharing!
ReplyDeleteBeautiful card with such pretty color combinations Can't wait to try the chalkboard technique.
ReplyDeleteWOW your card is so awesome you really did one super stamping job!!
ReplyDeleteThanks for the great directions I am so going to do this. Gosh girl 1st time and you rocked this technique
Thanks for the great recipe.
Wow, your card is just gorgeous!!
ReplyDeleteLeslie
A matching card makes a gift bag really special. These are so pretty!
ReplyDeleteLove the card. Thanks for the tips about the chalkboard effect and the use of this font set.
ReplyDeleteWhat a fun card with great instructions. I love the chalk board look. Hope you are doing well!
ReplyDeleteThis is such a sweet card and gift bag set. I will have to try making them! Thanks for posting!
ReplyDeleteLovely card. Your ideas are amazing. Thanks for sharing.
ReplyDeleteI love all the vibrant colors and the new technique on this card!
ReplyDeleteI saw this card on your weekend roundup post and I had to come over to check out how you created it. The chalkboard look stands out so great on cards and I like how you paired it with the pretty pastels. The heart jewel in the center is a nice touch along with the swirls of pearls to go with the gift bag. Even the inside is so pretty and finished with so much care to details.
ReplyDeleteThank you so much for sharing these great ideas! Very inspiring. :)
Love the card and thanks for sharing the technique. I have seen stickers and other embellishments but none were quite what I wanted, this means I can make just what I want! Thanks again!
ReplyDelete